

Introduction
In our guide for basic introduction, we gave a basic overview of the visual builder tool.
Following on from that, we can now explain the process of editing content in more detail using some case examples.
As mentioned, your website was built and designed with the visual builder so this is the same tool used when it comes to editing. In truth, there is a fairly extensive list of possible modules to pick from depending on what is needed.
Use the anchor links below to jump to the relevant section:
Changing text modules
Changing image modules
Changing button modules
Changing blurb modules
Get in touch
Changing text modules
On your website page, the content you may like to edit are commonly things like text or images. In this guide, we will go through a few case examples and explain the process of editing these.
Login and go to the page you wish to edit. Once there, enable the visual builder tool as normal. When the VB is loaded, go to the module of the text you wish to edit. Click on its highlighted grey box, then click on the module settings icon in the menu that appears.
The settings menu will appear. Note that it says ‘text settings’ in the top-left. Amend the size and position of the menu if it is not good for you.
When you open the menu, as it’s a text setting one you will see a section that works very much like a word processor. In the white box should be the text, which is the same text on the page itself. You can simply type into the box to amend text or you can copy/paste from another source like an email.
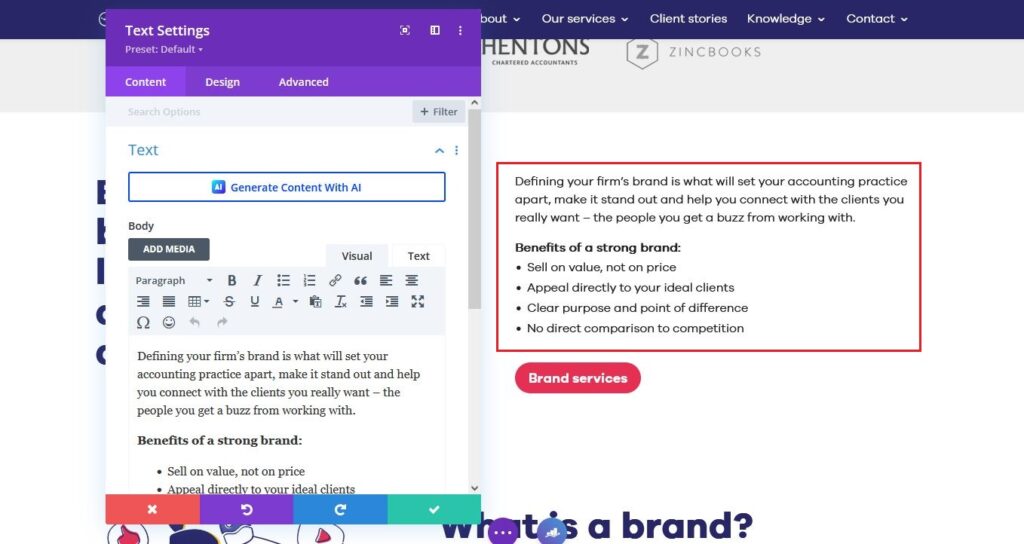
Additionally, just above the text editor you will see a toolbar of various options you could use, with many being recognisable such as:
- Text class such as paragraph
- Bold
- Italics
- Underline
As you change the text, you will see them being ‘printed’ on the page. If you have the menu side-by-side with the text on the page this is easier to see. It’s very useful as you can see potential changes before you save.
Once you’ve done your changes, you can do either the following:
If you want to confirm your changes, click on the green button. Once done you will need to also click on the circular purple button with 3 dots in it. Click it, then click on the save button.
If you want to cancel your changes, click on the red button.
Changing image modules
Go to the module of the image you wish to edit. Click on its highlighted grey box, then click on the module settings icon in the menu that appears.
The settings menu will appear. Note that it says ‘image settings’ in the top-left. Amend the size and position of the menu if it is not good for you.
Image settings are slightly different to the text ones. You will see a box containing the current image. To change it, click in that box.
You will need to upload the new image into your website’s media library, if you haven’t done so already. Upload the new image and select it from the media library. Your new image will replace the old one.

Then save or discard changes in the normal way.
Changing button modules
Go to the module of the button you wish to edit. Click on its highlighted grey box, then click on the module settings icon in the menu that appears.
The settings menu will appear. Note that it says ‘buttons settings’ in the top-left. Amend the size and position of the menu if it is not good for you.
For buttons, the two main things you probably will do is:
- Change the button text
- Change the button link

For the text, open the ‘text’ field and there will be a field with the current button text. Simply amend the wording to something different if you are indeed going to change this.
For the link, open the ‘link’ field and there will be a field with the current button link. If changing this, delete the current link and paste in the new link.
You will also see another field for ‘link target’. Here you can specify if the new link opens in the same browser window or a new one. If you’re linking to another page on your website, you might be better off leaving it as ‘same window’. But if linking to a third-party site [e.g. BBC], it is recommended to select ‘in a new tab.’
Then save or discard changes in the normal way.
Changing blurb modules
Go to the module of the blurb you wish to edit. Click on its highlighted grey box, then click on the module settings icon in the menu that appears.
The settings menu will appear. Note that it says ‘blurbs settings’ in the top-left. Amend the size and position of the menu if it is not good for you.
Blurbs are modules that can be seen as a combination of text, image or an icon. They are quite useful to highlight certain content like what types of services you provide on your main services page.
When you edit a blurb module, you’ll see various elements that will be familiar to you.

You have the ‘text’ field to change aspects to do with the text.
You have the ‘image/icon’ field to change aspects to do with the text. You can upload an image in the same way. If you don’t want to, you can instead use one of the predefined icons that the visual builder has.
You have the ‘link’ field to change aspects to do with the link, if you wanted the blurb to be a clickable link.
Get in touch
Hopefully that gives an overview of how to use the visual builder to change very common modules you may find on your site.
We trust this guide has helped but if you have any questions, please get in touch at: support@practiceweb.co.uk